Some Tips and Tricks for Making a Time Lapse of a Pregnancy
Before I get started with my tips and tricks for making a pregnancy time lapse, I must confess that this was definitely not my idea, nor are my two versions the best. So before beginning your video I recommend heading over to YouTube and watching a few of the other time lapses out there to get some ideas. Try a search like this “Pregnancy time lapse.”
It’s also worth noting that I don’t plan to do a step by step tutorial but rather cover some key steps I used including image alignment, exposure matching, colour correction, and stabilsiation. I’ll also give some brief tips and tricks regarding setup, planning and camera settings. The rest is up to you and does require some Lightroom, Photoshop and After Effects/Premiere Pro knowledge.
Equipment and software used…
Equipment
- Canon 7D
- Canon 18-135mm
- Canon Speedlight 430EX
- Hahnel Triad 100 Tripod
Software
- Adobe Lightroom CC
- Abode Photoshop CC
- Adobe After Effects CC (although Adobe Premiere Pro will work fine)
Before getting started…
Once you’ve decided to make a time lapse and/or stop motion of your pregnancy, there are a few things you need to consider before getting started.
Firstly you need to decide on a theme and a location. Do you want it to be fun, or serious? Should it take place indoors, or outdoors? I’d recommend that you try and match your personality and passions. But remember, a lot can change over 9 months. So while having it outdoors may be fun in summer, it could be freezing in winter. That said, having the seasons change in the background as a tree’s leaves change colour and fall off can show the passing of time beautifully.
Another thing to consider is the background of your video. Taking your photos in front of a plain white wall will make it easy to align and colour correct, but it may be a tad boring in the long run. Similarly taking your photos in front of a busy background can be distracting and make image alignment and colour correction difficult. Consider also the elements in the background. Do you really want people to see a time lapse of your dirty dishes piling up? Or of your laundry pile growing. Rather chose something like the nursery where changes in the background are more likely to add to the video. For example you may see the room slowly take shape as a cot appears and new pictures are hung.
Consider also including family in your time lapse. While including a 3 year old can be tricky, and family pets are near impossible to work with, they make the video fun and will be cherished forever. Also don’t get too worried about them not being perfect. Little mishaps can add to the feel of the time lapse. So keep those “bad” shots as you may find they add character later.
Next up, consider what will your wife be wearing? I’d recommend your wife stick to the same clothing through the time lapse. While changing clothes can have a nice effect (and some people have made it work), I generally find it deters from the look of the belly growing over time (as the viewer is not as engaged). Also remember to plan for the size of the bump in 9 months. So while that tight shirt may look good now, it may not fit later on. And you don’t want to have to change midway through – there are no do-overs.
Taking the images…
So now that you’ve chosen a location, and know what your wife’s wearing, it’s time to start taking the images.
Making use of a tripod is a must as it gives you your best chance of taking the exact same image each day, which will make the processing phase later on far easier. Without this your time lapse will “bounce around”, making it difficult to stabilise. Colour correction will also be more difficult which can cause flickering in your final video.
The ideal situation would be to setup your tripod, and to leave it in position for 9 months. This however is not always possible. So if you find you need to move your tripod, make sure you mark the position of the legs on the floor. You can either do this by making use of existing markings (where tiles meet for example) or by marking the floor with some tape. Also try to mark the height and angle of the tripod, perhaps using a pen on the tripod itself. Changes of height and angle cannot be corrected in post processing.
TIP: Try to also have several items in the photo that are stationary. These will assist you in stabilising the video later on. They will also assist you in aligning your photos every day.
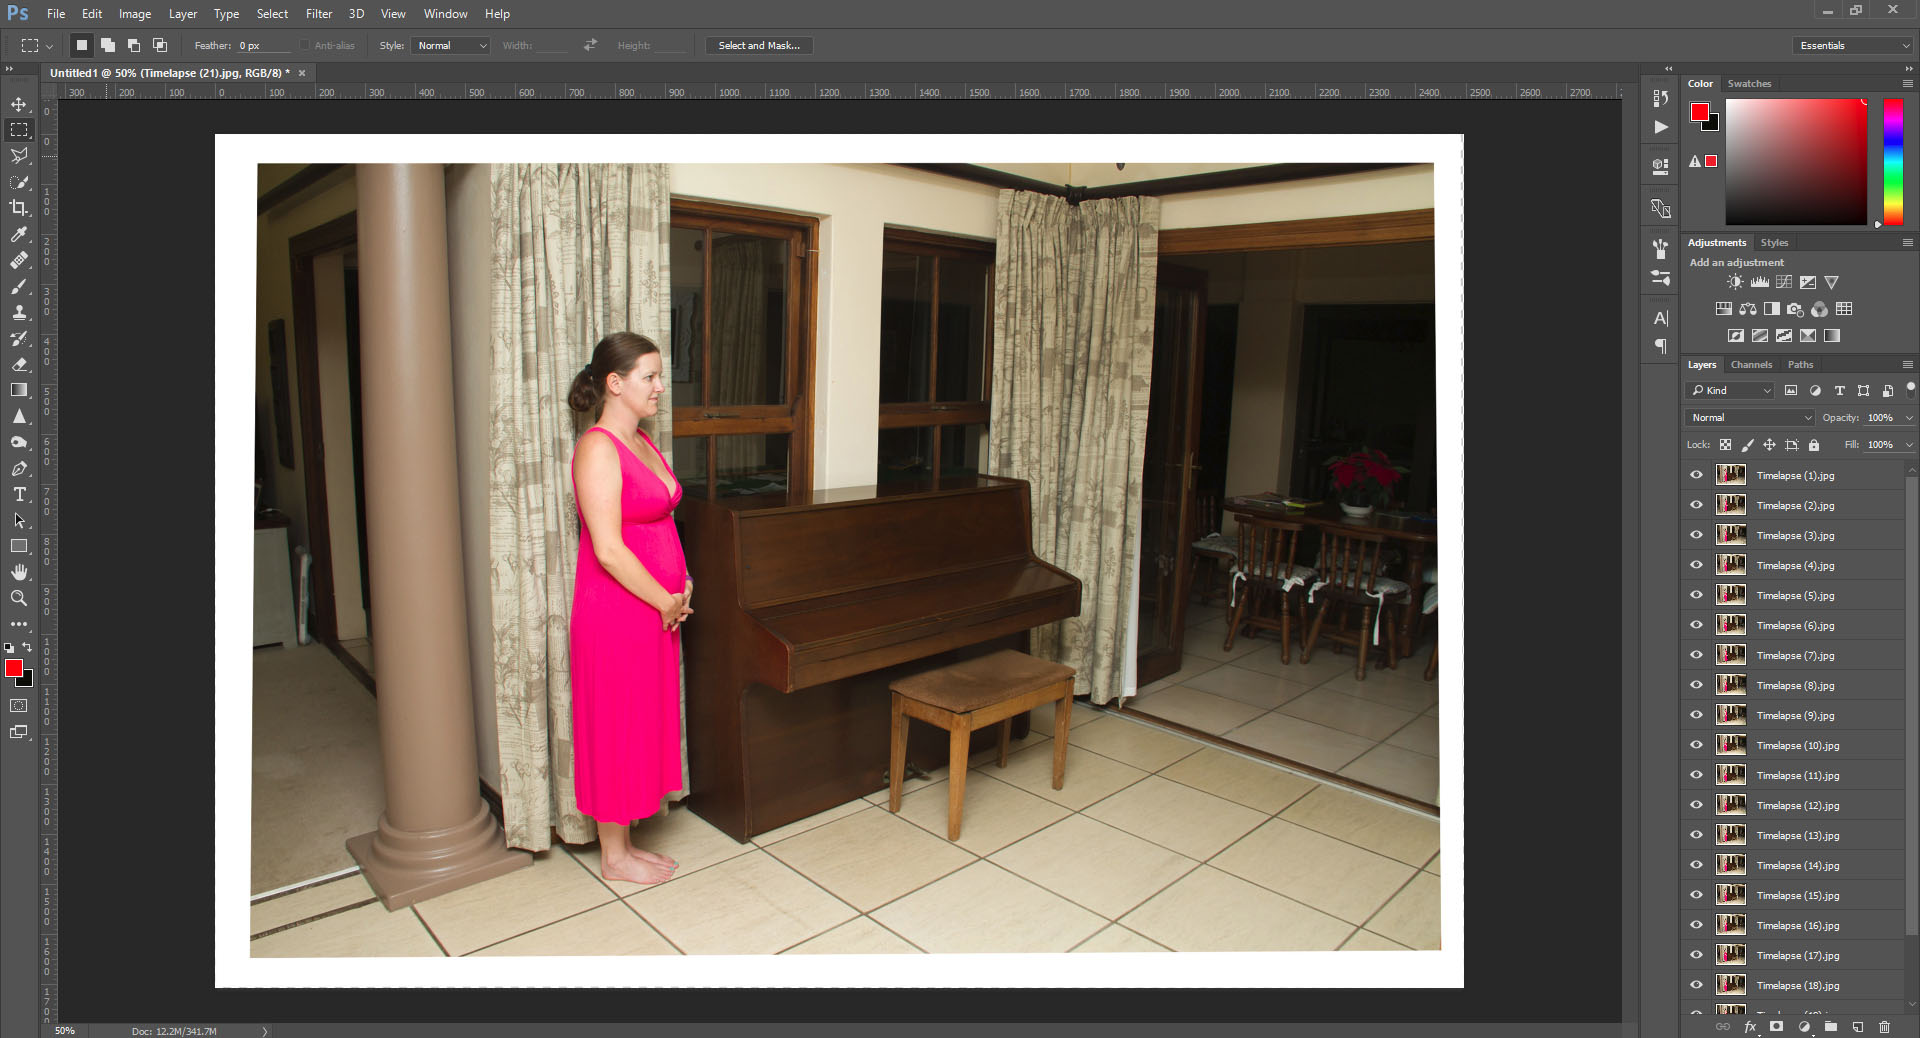
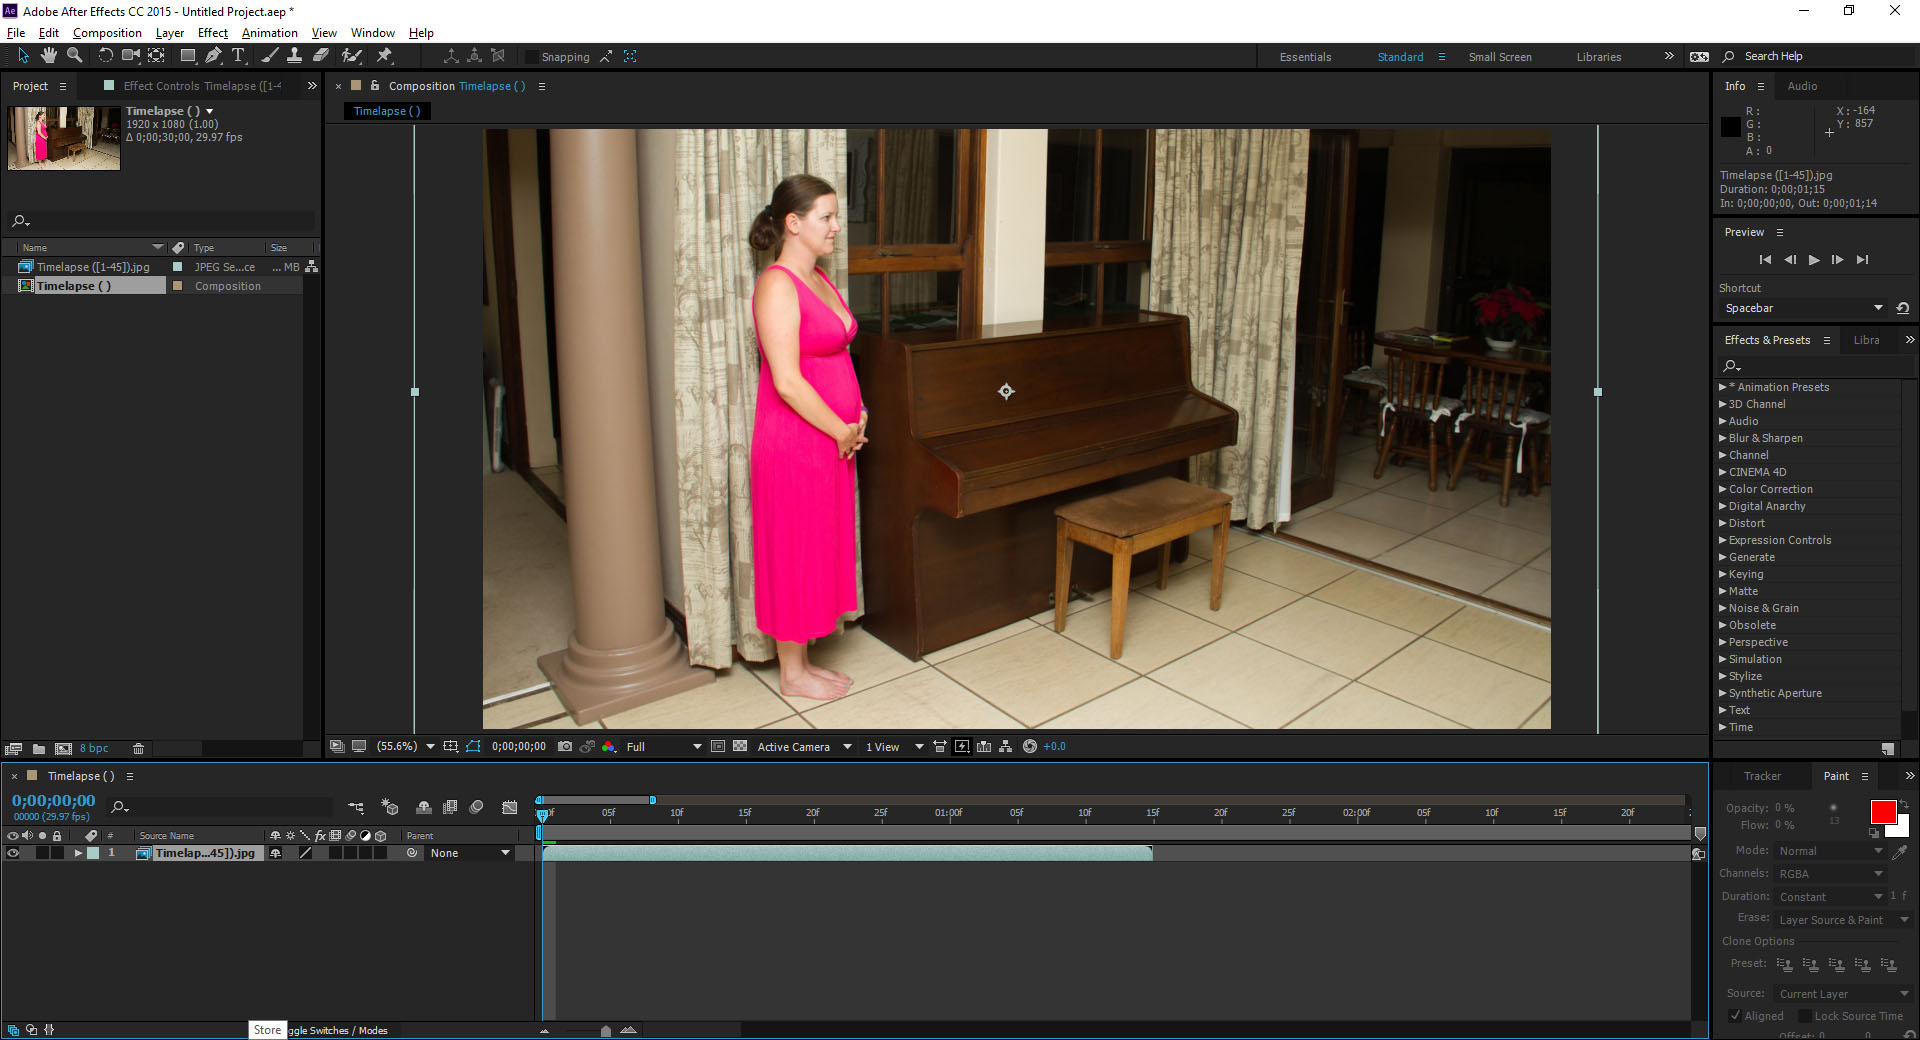
Other than marking the position of the tripod you also need to mark the position of your model…ummm…wife. Obviously you need her to stand in the exact position every night so its important she knows her spot. Here tape is less of an option since you don’t want it in the final video, so try and pick a mark on the floor. In the below example my wife stood at a 45 degree angle to the tiles with her toes on one line and her heel on the other.
Another important thing to remember is that your camera takes images in a different aspect ratio than standard video. So, if you camera takes images in an aspect ratio of 3:2 for example, and you want your final video to be in a standard HD aspect ratio of 16:9, make sure to leave a lot of space around your wife to allow for cropping. See the example below.
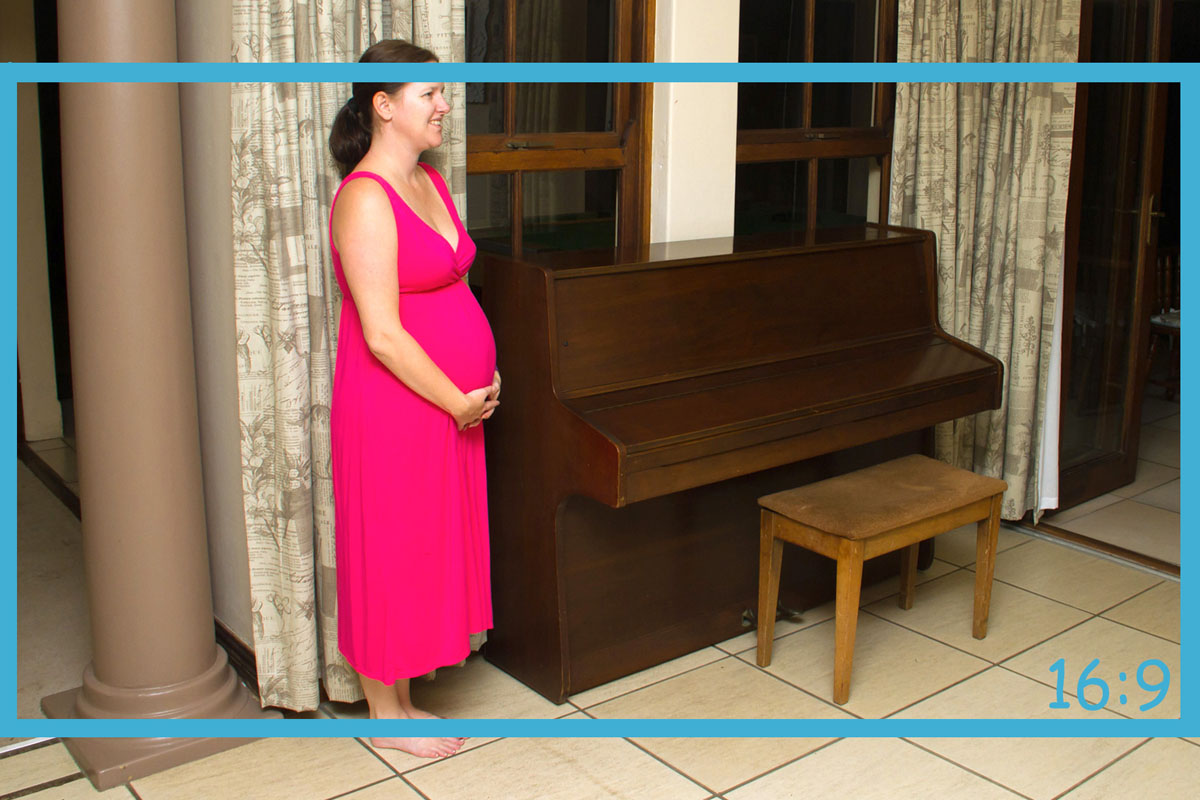
If you have any movable objects in the image (for example the piano stool in the above photo), be sure to position them in the same space every day to avoid jitter. Alternatively move them slightly every day in a distinct path to add interest to your image. A good use of this would be to move a new object (for example a cot as you ready the nursery) into the scene frame by frame as if it slides in on its own.
Get those camera settings right…
One of the biggest failure points for time lapses are the user’s camera settings. Using any form of auto mode is a no no and will again cause you a lot of pain down the line when converting the images into a movie. There are 2 main reasons for this.
Firstly, without manual control over the settings each image could have a different exposure (causing exposure flicker) and a different colour balance, (causing colour flicker)
And secondly, using an auto mode could result in each image being taken at a different aperture.This would result in different focus in each image making which would not be ideal in the finished product. For example, a tree in the background could go in and out of focus.
I would recommend setting the camera on manual (on my Canon 7D I turned the dial to “M”) and choosing a set of settings. For example I used f6.3, 1/50th sec, ISO400, lens at 18mm with my flash exposure set to -2/3. I didn’t worry about the white balance as I was taking the images in a RAW format and could therefore adjust this afterwards. If however you are shooting in JPEG mode, be sure to use the same white balance as well. I also used the same focus point, always on my wife of course.
Finally always remember to take the photos under the same conditions. I chose to always take mine at night with the same lights switched on. Changing lighting can be near impossible to fix in post processing and can ruin the whole effect.
TIP: If you have to change a lightbulb in the room, use one of the same colour and wattage to avoid flicker in your sequence.
Adding a stop motion intro and/or closing…
Adding an intro and a closing scene is a great idea and I highly recommend it. I find that a stop motion scene works well as it fits in with the time lapse theme. Stop motion is similar to time lapse, however rather than accelerating time it gives it a more strobe effect.
To “film” a stop motion intro I’d recommend your camera be on your tripod in position for the time lapse, and with the same settings. This will give you a seamless transition from your stop motion into your time lapse and back.
Use a remote to trigger your camera every few seconds (I find 5 works well). Then stand in position and let the shot fire. Using the 5 seconds move into your new position and repeat. If you miss a shot don’t panic. Just wait for the next 5 second burst and delete the shots you don’t need. You can get incredibly creative here and again I recommend you watch a few stop motion videos to get a few ideas.
So how many images should you take…
This is a near impossible question to answer, although the simple answer is the more the better.
WARNING: Asking the wife to take an image every day for 40 weeks can result in divorce and your time lapse not being completed.
I found that 3 a week works well, and wouldn’t go too many less. This would result in around 120 images which gives a nice fluid time lapse. Less images can make the sequence jittery.
TIP: You need to take the same number of images each week. Changing the rate will result in the bump not “growing” at a fluid rate. In the final video it will grow slower when you took more images and faster when you took less. Don’t panic about this too much, but also don’t forget about it.
Processing the images…
Okay, so you’ve put in the hard work and have taken the “same” photo for 9 months, as well as a few extras for a stop motion intro and closing scene. So now what? Well it’s time to process of course.
As I mentioned earlier, I made use of Adobe Lightroom to do my RAW to JPEG conversion. I’m not going to go into too much detail here, other than to say pick any image (they should all be similar) and then process it to your liking.
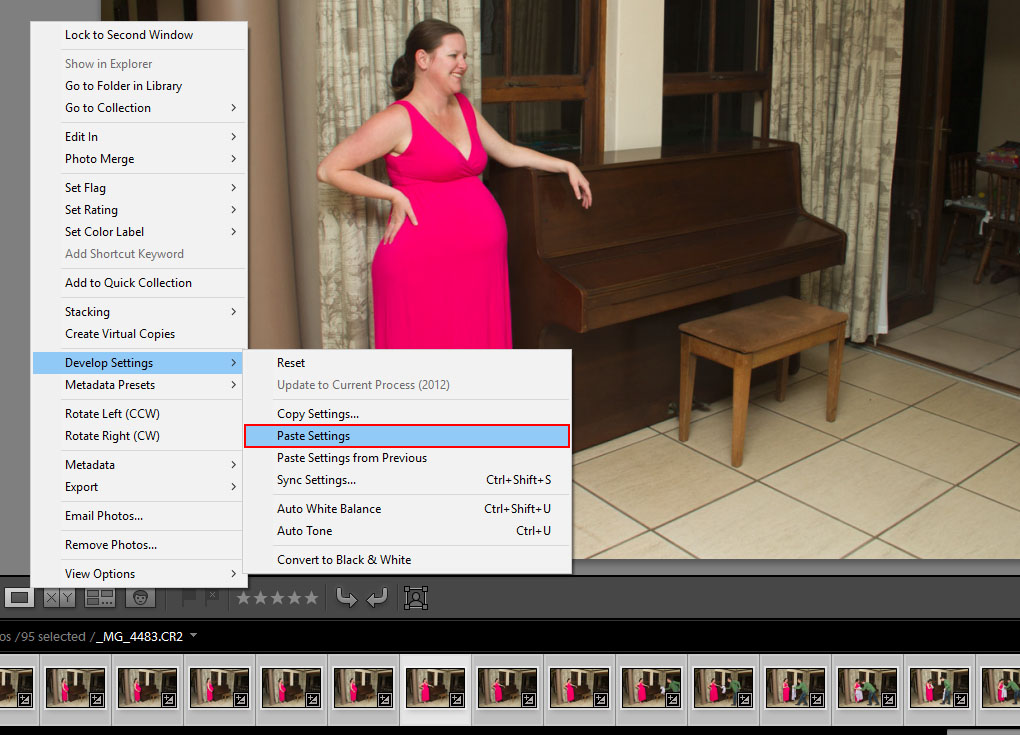
Once you’ve completed your processing copy the settings from your processed image (by selecting the image and pressing Ctrl + Shift + C), and then paste the settings onto ALL the other images. Do this by selecting them all the images, right clicking on them, going to “Develop Settings” and then clicking “Paste Settings”.
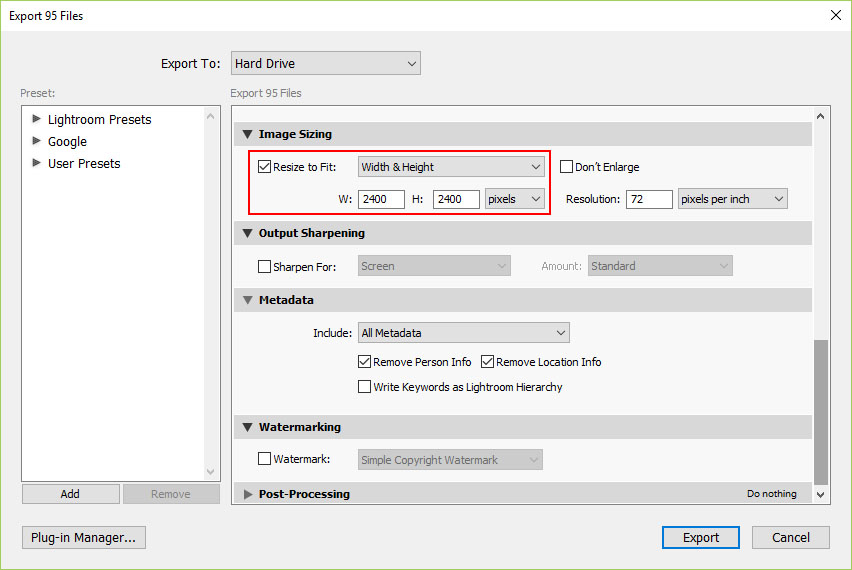
With any luck your images will now all be identical (since you used a tripod and manual camera settings). You can now export all the images into a folder. I wouldn’t recommend exporting them at full size as this is not necessary and will slow down the upcoming steps. Since HD footage is 1920 x 1080, I’d recommend going just slightly bigger than this. I exported mine at 2400 x 1600. Any bigger and the below Photoshop steps will take longer for no real benefit.
Aligning the images…
Now if you’re anything like me, despite your best efforts and putting the tripod in the same spot every day, your images will not be perfectly aligned. This will result in bumpy time lapse sequence. Thankfully this can be partially solved in post processing if the images are similar enough. I use a 2 step approach. Firstly align the images using Photoshop, and then secondly stabilise the sequence in After Effects of Premiere Pro (I’ll get to this second bit later).
To align the images in Photoshop I loaded them into a stack, aligned them, and then exported them as individual files. Below is the process I followed:
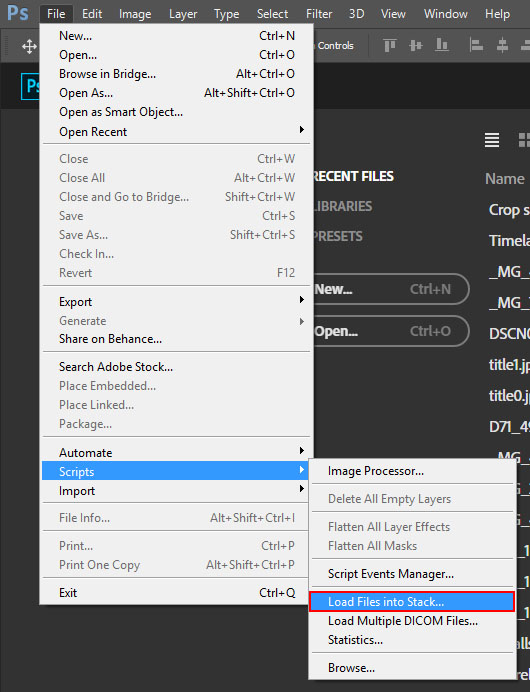
As per the below click on “File”, “Scripts”, “Load Files into Stack”.
This will bring up a dialog. Click on “Browse” and select all your images. Then check the box which says “Attempt to Automatically Align Source Images”. This is the key step and will ensure all layers are aligned. It may take some time and there is no good progress bar. So don’t assume the worst and instead go and get a cup of coffee.
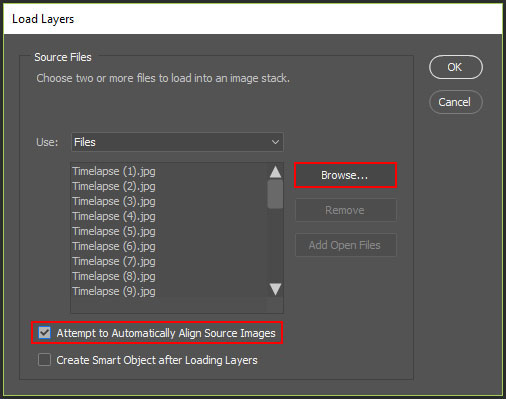
Assuming everything went well you’ll end up with a screen that looks like the below. Each image will be an individual layer, and should be aligned. Don’t be alarmed by the white outline, this was created as images were moved to align them. We’ll sort this out later.
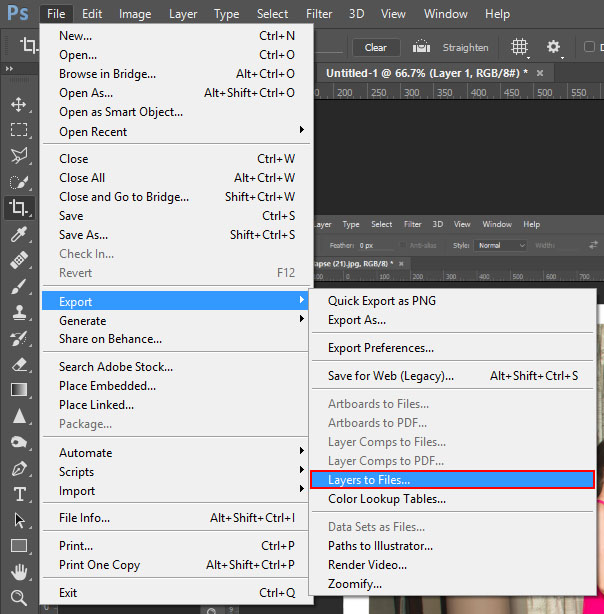
With the images now aligned all that remains is to export them back to individual files. As per the below click on “File”, “Export” and choose “Layers to Files”.
This will bring up a save dialog. I’d recommend saving these into a new folder and not overwriting the original images. You may want to come back and make changes later.
Matching the colour and exposure…
You should now have a folder containing all your images, nicely aligned, probably with a white border around them. Assuming all is going well the main difference between the files now is probably the exposure (and perhaps a slight colour cast which we’ll fix later).
Again, despite using manual camera settings and shooting in the same lighting conditions, my images always seem to have slightly different exposures. There are many theories on this, some of which I’ve listed below:
- Although your camera aperture is constant (in my case F6.3), the tolerance on the camera setting this is generally around 97% meaning the exposure will differ slightly. There are several fixes to this from shooting with the lens wide open to using more manual lenses.
- Batteries on the flash may be dying
- Items in the scene may be slightly different, or in different positions
- Overhead lights have an invisible flicker or can change in brightness depending on the electricity supply at the time
- etc
I fixed these exposure differences using a cool Photoshop feature called “Match Colour…”
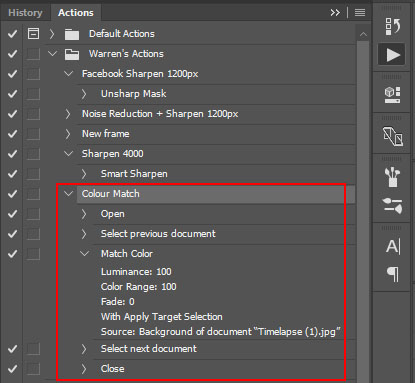
Sadly the feature seems to be aimed more at working with just 2 images, which didn’t suit my 150 odd photos. This meant creating a Photoshop action which I could then apply to all images using Photoshop’s “Image Processor…” I created my action as follows.
- Before beginning browse through your images and select one which you believe is of the correct exposure and colour balance. In my case I chose the image called TimeLapse (1). This is the image you’ll be matching all other image’s exposure and colour to.
- Next open a test image (not the image you selected above). This is done outside the recording of the action since I didn’t want it to be part of the action. This will form part of the “Image Processor” step later.
- Now it’s time to create the action. Open the Actions Panel and click on the new Action icon in the bottom left corner.
- A “New Action” dialog will appear. Give the action a name such as “Colour Match” and click Record.
- Open the image you selected in step 1.
- Click back onto your test image from step 2 (as this is the image we’re correcting while recording the action).
- Click on the “Image” menu, the “Adjustments” and finally “Match Color…” The below dialog should appear.
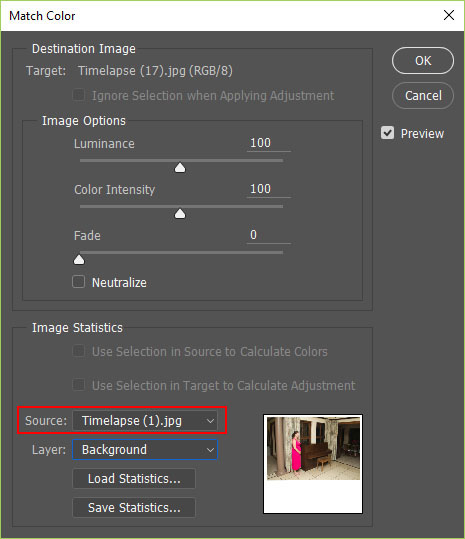
- Generally the default settings look pretty good and all you should need to change is to select your source image. Be sure to set it to the image you chose in step 1 and then click OK. You can fiddle with the other settings to fine tune your end result, but I’m not going to discuss that in detail here.
- Now click back onto the image you selected in step 1 and close it.
- Finally click on the stop recording button. You action is complete and if you expand it will hopefully look like mine below.
- Now that you have an action it’s time to apply it to all of your images.
- Close all open images and then click on “File”, “Scripts”, and “Image Processor…”. The below dialog should appear.

- Again the default properties are generally okay. All you need to do is to select your folder of aligned images at the top of the dialog. Be sure to also check the “Run Action:” check box and to select your colour match action created above. Finally click run and let Photoshop do it’s magic running through all images.
The end result of the above steps should be a new folder called “JPEG” in your aligned images folder. These will be you aligned images with colour matching applied and are now ready to be imported into either After Effects or Premier Pro to create your time lapse.
Final touches to the images…
At this point it will be worth scrolling through all your images looking for any that are badly out of place. Things to look out for are:
- Objects that are in just a single frame. For example one of my frames had a birthday balloon in it.
- Images that are distinctly lighter or darker
- Images that are of a different colour
- Images where your wife is in the wrong place
If you find any of the above you have a few options.
One option is to delete the photo. This works well as long as you have a lot of images, and don’t have to delete a lot of photos. So basically I’d recommend doing this with only 1 or 2 images.
Another options is to correct the images in Photoshop. For example, in the case of the random balloon I merely used the clone tool to remove this from my image. For lighter and darker images, you can manually darken or lighten them. We are however going to do some colour stabilisation later, so don’t worry about images that are only slightly off.
TIP: You can also do this after creating your time lapse in After Effects, and then re-render it. So it may be worth leaving the brightening and darkening for later, and doing it only if you’re unhappy with the final product.
Importing the footage…
I’m not going to go into too much detail here as the point of this tutorial is to discuss stabilisation and and flicker removal, rather than the creation of the time lapse itself. However I do feel a quick “How to” will help the less advanced people.
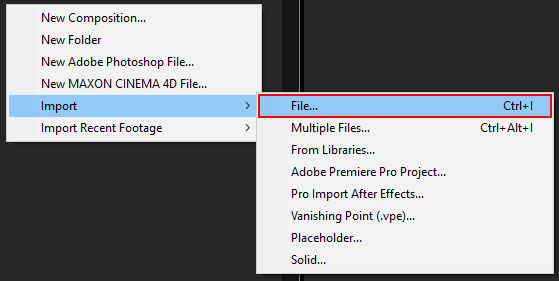
Start by opening Adobe After Effects CC and creating a new project. You then need to import your files. Right click in the project window and choose “Import”, “File…”.
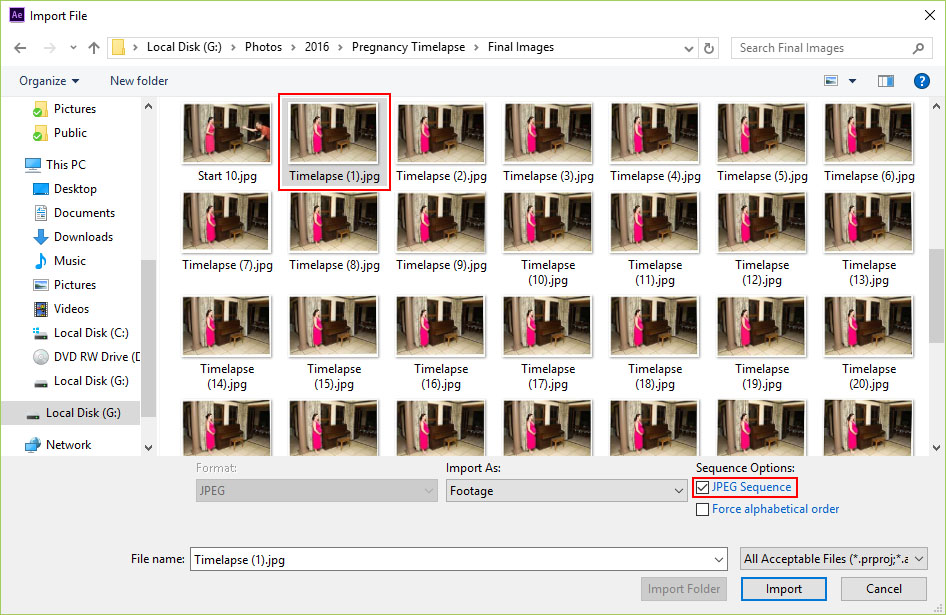
In the dialog that pops up select the first image of your aligned and colour corrected photos. Check the box which says “JPEG Sequence”. They should be in order thanks to your cameras numbering. However if you have renamed them be sure to make sure they’re in the correct order.
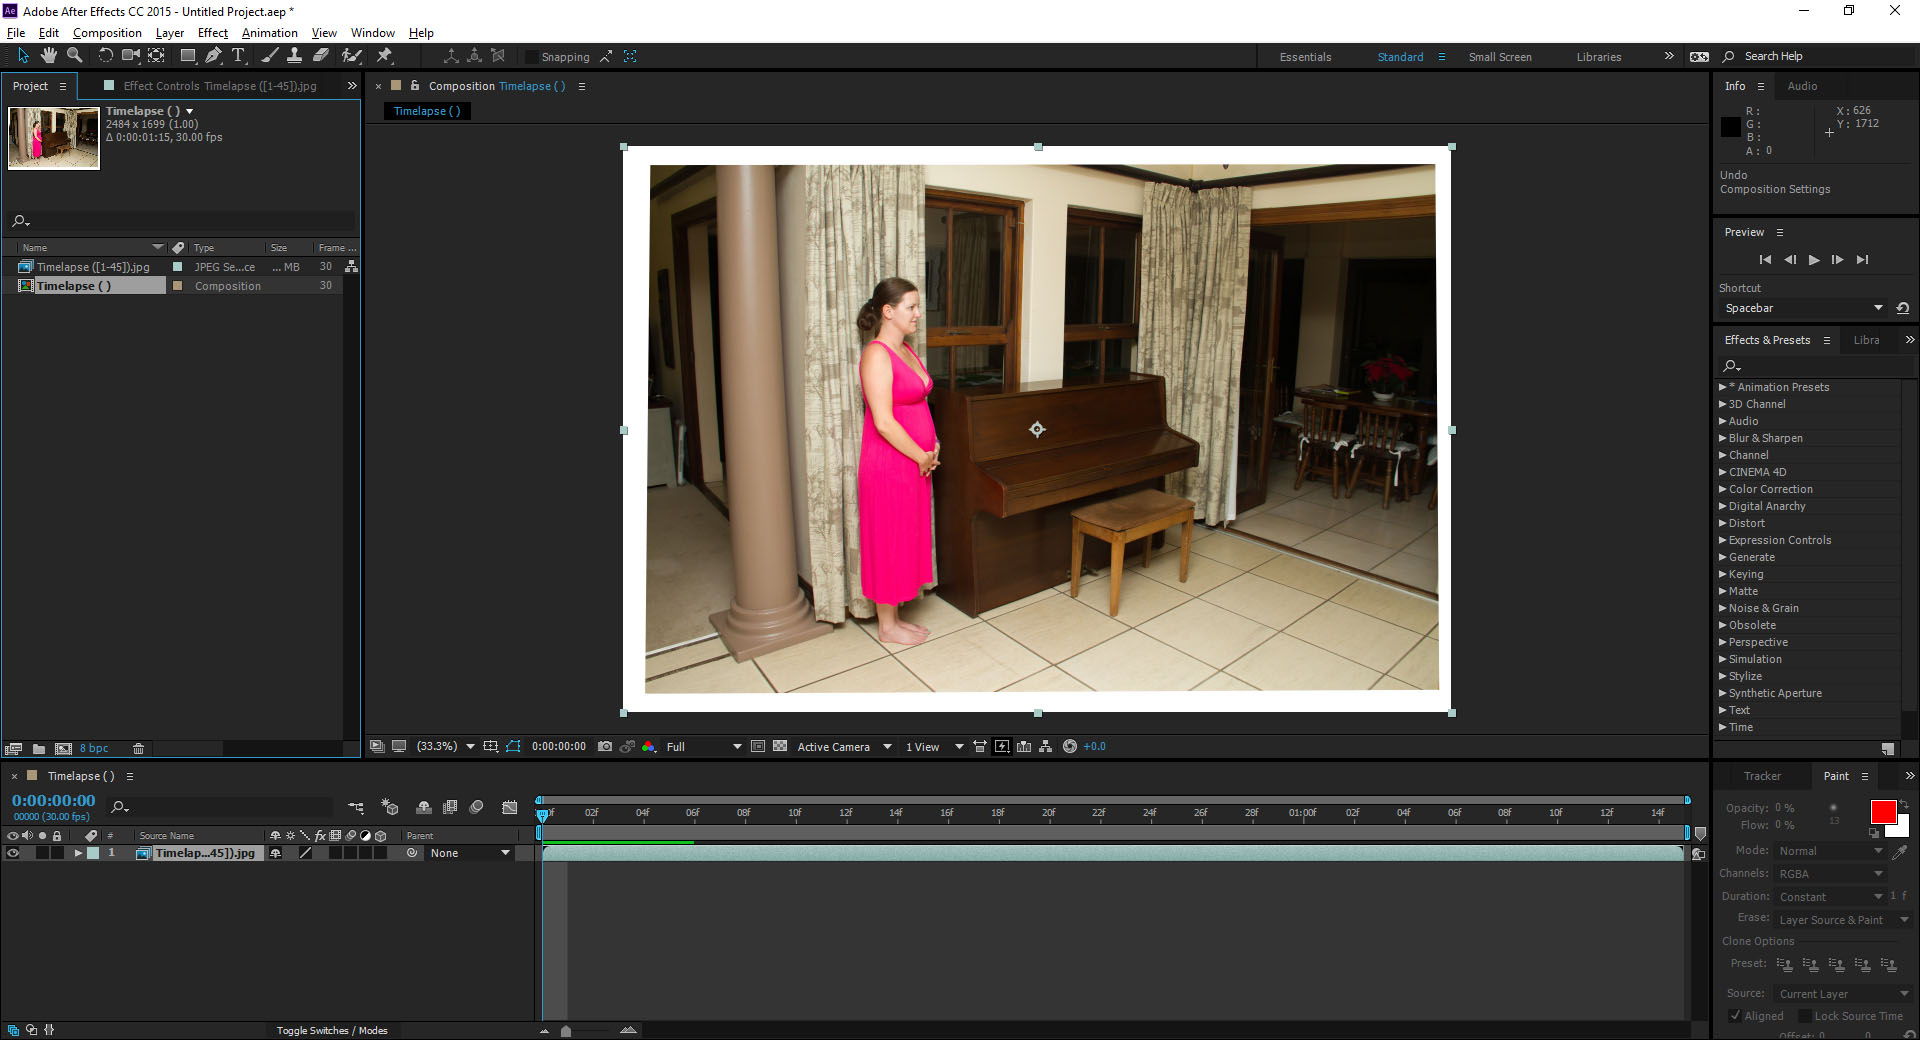
This will create a JPEG sequence in the project as per the below.

Drag this sequence onto the timeline to create a new composition. This will have the same aspect ratio as your images. It will also still have the white border created in the alignment step in Photoshop. Don’t worry about this just yet.
If like me you want it to be in standard HD format, right click on the composition in the project window and choose “Composition Settings…”. This will produce the below dialog.
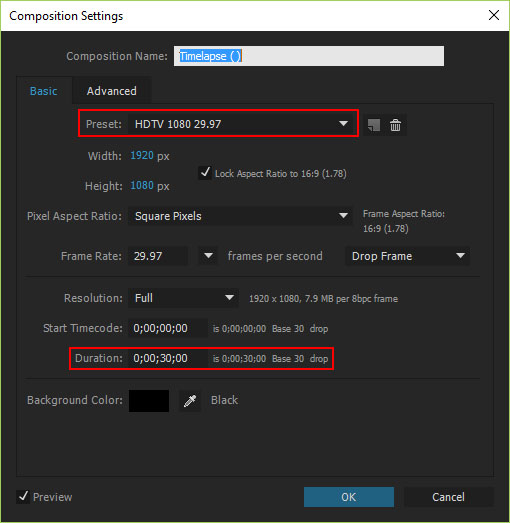
In this dialog select the Preset of your choice. I chose HDTV 1080 29.97. Be sure to also change the duration to allow you enough time for you time lapse. Don’t worry about this too much as you can always change it later. Once you’ve done this your image will be clipped. Drag the corners and move the image around until you’re happy with the composition (and have gotten rid of the white border).
TIP: Holding down the Shift key will maintain the aspect ratio.
At the end of this step your composition should be starting to take shape and look something like the below.
At this point clicking play with play your time lapse, although it will undoubtedly be too fast. Right click on the sequence and the click on “Time”, followed by “Time Stretch…” This will bring up a Time Stretch dialog where you can input a “Stretch Factor” as a percentage to either speed it up or slow it down, depending on how you want it to look and feel.

Excluding any intro and exit scenes you wish to add (and which I’m going to leave up to you), you’re now getting pretty close to having a complete time lapse. Depending on how well the Photoshop image alignment went the video should also be relatively smooth. There should also be relatively little flicker caused by exposure or colour differences. That said, at this point my time lapse still had some shake and flicker, so I moved onto the below 2 steps to further correct these.
(Re) Stabilising the footage…
To further stabilise the footage I made use of Adobe’s warp stabiliser. This feature is available in both After Effects as well as Premiere Pro, although some of the options differ fractionally (there are a lot of tutorials on this feature so now might be time for another Google search).
To add the warp stabiliser to your footage, search for it in the “Effects & Presets” panel and then drag it onto your footage. At this point you will see a banner saying “Analyzing in background” followed by “Stabilising.” This is the warp stabiliser doing it’s magic and, depending on your machine and footage, this can take a while so have some more coffee.

Once it’s completed your footage will hopefully be more stable. That said, depending on the scene it can get it wrong which is when you may need to fiddle with some settings, and do some more Googling. I find this step to be more trial and error.
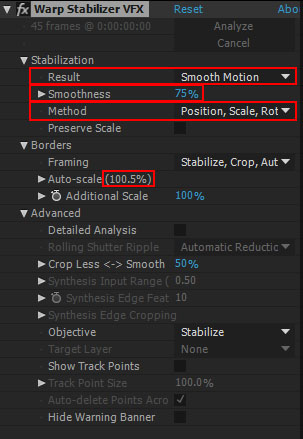
In the below image you can see some of the settings I tend to change.
Firstly, since your camera is not moving in the shots you can change the “Result” from “Smooth Motion” to “No Motion”. If you choose keep it on “Smooth Motion” you can also try upping the “Smoothness” percentage. Bear in mind that any of these changes could result in further scaling (and hence clipping) of the image. In the below example it’s only scaled it up by 0.5% which is fine.
Another setting to think about changing is the method. Changing from “Subspace Warp” to “Position, Scale, Rotation” can result in less warping of the image. However I’d only worry about this if you are noticing warping in the corners.
If after all of this you are still not happy there are a few other techniques you can try.
The one I favour is to delete Track Points on areas of known movement. So in my time lapse I deleted track points on the curtains for example, as well as on the piano stool as it moved slightly daily. To get After Effects to base stabilisation on moving objects is sure to add to shake.
To do this you expand the “Advanced” options and check the “Show Track Points” check box. This will display all the track points on the clip. If you feel there are not enough track points you can also check the “Detailed Analysis” box to add more points. You can then delete any track points you feel are on moving objects by drawing around them to select them, and then pressing delete.
In the below image I’ve deleted the track points on the right hand curtain, as well as on the piano stool. You can still see the track points on the left curtain which I ultimately deleted as well. I left the track points on the floor and piano as I knew these were points that would not move.

The downside to this approach is that as you move through your footage After Effects new Track Points will be added, so you’ll need to repeat the above process every few frames.
Although this can be a time consuming process, it is worth it for a great final product.
Another technique to improve stabilisation is to mask out areas of movement. I’m not going to detail this technique, but effectively you need to create masks over areas of movement. You then create a new composition with these areas removed and stabilise this composition. Finally you hide the masks in the original composition and the new composition will be stabilised while ignoring these areas. Try Google again for a more in depth tutorial on this.
Colour stabilisation…
At this point your time lapse should now be a good length, cropped nicely into 16:9 format, and (hopefully) very stable. All that remains to do is to improve any remaining colour flickering in the video.
To do this I make use of the “Color Stabilizer” effect built into After Effects. Again add this by searching for it in the “Effects & Presets” panel and then dragging it onto your clip. Hopefully it will do a relatively good job. However if not, you can easily correct this by dragging the “Black Point” and “White Point” (and sometimes “Mid Point”) onto neutral areas close to black and white.
As you drag them you’ll see the colour changing. Leave them in positions that you feel accurately represent the scene.
These points do not move during the scene, so be sure to leave them on stationary objects or the colour will change as the objects under them move, worsening any flicker.
If however you can’t find a point that is stationary for the full video, you can use key frames to move them yourself where necessary. This is however a little more advanced, so I suggest you Google a tutorial on it.
Closing thoughts and other ideas…
And that’s it, you’re done! Your video should now be stable and free of any flicker – in other words, AWESOME!
At this point you can use some of your other After Effects knowledge to bring the video to life. Try adjusting the levels, curves, and saturation to make the video pop. You can also consider adding a vignette to bring more focus to the scene.
In one of my time lapses I also scrolled the baby scans across the screen at the appropriate time, adding another element to engage viewers.
There’s just so much you can do, so now’s the time to be creative!
Oh, and here are my final products.